
A Guide to Growing Native Plants from Seed
Preparing Seeds
Not all seeds will germinate immediately after being planted in soil. Many native species require natural cycles — such as experiencing a few months of cold winter weather — to break their dormancy and start the germination process. This evolutionary trait stops seeds from germinating during unfavorable conditions like cold or drought.
Many free resources can help growers find what’s needed to break their seeds’ dormancy. Prairie Moon Nursery is a commercial native plant nursery offering a wide variety of plants and seeds available on their website. The web page for each plant species provides stratification information. A grower can simply search their website for a species and review the Germination Code provided with the species’ details. Each germination code has a specific set of instructions growers can use to aid germination. You can click or hover over the code on the species webpage, or download the list of germination codes for full instructions.
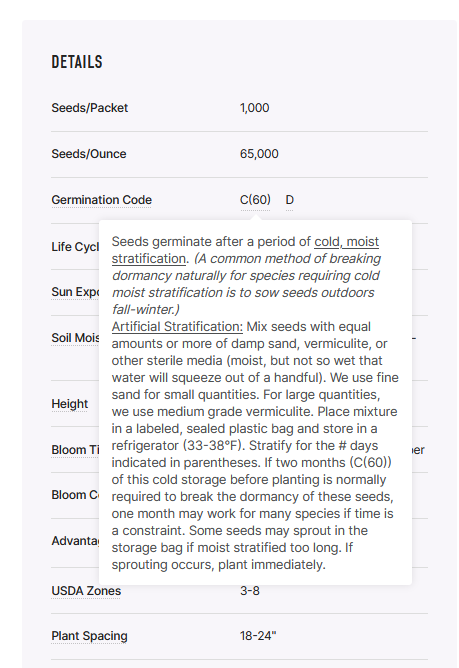
The codes for this plant are C(60) and D. Hovering your cursor over the C(60) explains the seeds require a cold moist stratification period of 60 days. To break this seed’s dormancy, it needs 60 days in cold, moist soil. The other germination code, D, means that these seeds require sunlight to germinate. Cover these seeds lightly with soil so they’ll receive enough sunlight to break the dormancy following the cold stratification period.
Other online resources include:
- Roundstone Native Seed Similar to the Prairie Moon website, users can search for a plant and download a plant fact sheet with information on establishing the seed. Though they do sell individual packets of seeds, Roundstone specializes in bulk seed for large tracts of land. Roundstone can help select and establish meadows and prairies if you have a large plot of land. Located in nearby Upton, Kentucky, you can call them at 270-531-3034 or send them a message contact form.
- Propagation Protocol Database Search for your species of plant seed and review the Pre-Planting Treatments for germination instructions.
- Wild Seed Project Similar to the Prairie Moon website, search for a plant and review the growing information and germination code.
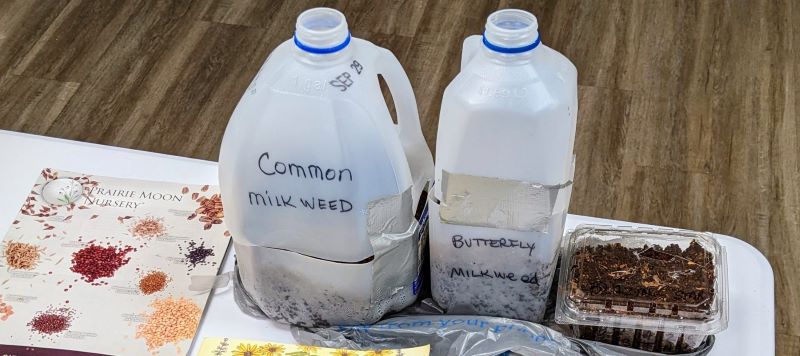
Understanding the treatments required can help determine the best germination methods. If your seeds need cold stratification, for example, you can sow them in an appropriate location outdoors in the fall, allow them to naturally experience winter weather, and wait for seedlings to appear in the spring! If you’d prefer to mimic this natural process indoors, you can do so with a few simple ingredients and your refrigerator. Simply place your seeds in a sealable plastic bag with a moist seed starting medium — such as damp sand, vermiculite, or a paper towel — and store it between 33-44 degrees for the required number of days. Keep in mind, plants with the germination code “M” do best if directly planted outdoors in the fall, and indoor methods may not work for these species.
Planting Seeds
After pre-treatments are complete, the next steps will differ, depending on the time of year and whether you’re sowing the treated seeds outdoors or indoors. If you have stratified the seeds according to instructions, you can sow the seeds outdoors at any time, although the best option is in spring when the seeds would naturally germinate without human intervention.
Winter sowing outdoors:
If you’re getting started in the winter, a tried and true method requires very simple materials, including a recycled gallon jug, scissors, packing or duct tape, a marker, and seed starting medium. The jug acts as a mini greenhouse in this technique and allows the seedlings to get a hearty head start. The jug protects from drastic temperature fluctuations and allows plenty of sunlight to reach the seeds. Interested in trying this method? Follow the steps below.
- Step One: Prepare Your Jug(s)
Gather one or more plastic jugs (no need to keep the lid) and make drainage holes in the bottom with a drill or the hot end of a glue gun. Cut horizontally around the jug, near the middle, leaving the handle intact (if your jug does not have a handle, leave 1-2 inches intact as a hinge). - Step Two: Add Seed Starting Medium
Put a few inches of seed starting medium in the bottom of the jug. Jiffy seed starting mix is relatively inexpensive and commonly found at big box stores. If it’s within your budget, seed starting mixes with mycorrhizal fungi (like ProMix) are a better option because they contain beneficial fungi that help with plant development. These mixes are less likely to be sold at local stores, and may need to be ordered online. - Step Three: Sow the Seeds
After adding the seed starting medium to your jug, sow the seeds according to any instructions or germination codes. If the instructions do not indicate depth, a good rule of thumb is to plant the seed as deep as it is wide. Tiny seeds should be scattered at the top of the soil while larger seeds can be buried under soil to the depth of the seed’s width. - Step Four: Water and Store
After sowing the seeds, water lightly, and tape the jug shut. The top opening of the jug should be left open. Don’t forget to label the jug with the type of seeds and the date you planted them. Store them in a spot with plenty of sunlight. Be sure the soil stays moist. You can water gently through the top of the jug, or if you’re storing the jugs in a tray, you can add water from below.
Starting seeds indoors:
Sowing the seeds indoors requires a very sunny location or grow lights, particularly for species with germination code “D” which requires sunlight for germination. A heat mat under the pots or trays can help warm the growing medium, but make sure your seeds don’t require cool soil to germinate (germination code “G”).
Keep the soil moist. Watering from the bottom is best. If you need to water from above, be careful not to displace the seeds or damage delicate seedlings. In this case, watering lightly more often is better than watering deeply less often. Check the type of plant you are growing to see how much water it prefers.
Transplanting seedlings:
Generally, when seedlings reach 2″ tall it’s appropriate to transplant them into individual pots. You can use a pencil, popsicle stick, or other small tool to help you separate individual plant roots. After separating, transplant each individual to a pot filled with loose medium like Pro-Mix. After transplanting from the jugs, keep the seedlings protected from harsh cold, heat, rain, and wind for a couple weeks and keep the soil moist by watering gently. Make sure to check the water and light preferences for the plant on a website like wildflower.org to make sure you’re giving your plants the kind of treatment that will help them flourish!
If you feel intimidated by starting seeds, there are many videos and websites that explain the process. A web search for “starting native seeds in jugs” will provide plenty of articles and videos to help you become more familiar with the process.
Where to Get Native Seed
Where can you find native seeds? Locally, the Wild Ones Southern Kentucky Chapter typically hosts a seed swap in December and sells native seeds twice a year at our Spring and Fall Plant Sales. Our chapter also donates seeds to the Warren County Public Library’s Seed Library. These free seeds are available to anyone with a WCPL library card! If you attend SOKY Wild Ones meetings, sign up for our emails, follow us on Facebook or join our Facebook group, you’ll find many other opportunities to receive seeds or swap seeds with our members.
If you want to purchase seeds from a native seed producer in Kentucky then Roundstone Native Seed is a great option. They sell seed in bulk and also in smaller packets. Browse their website to see what they offer and call or email them through their Contact Us web page to ask about options or to get more information.
Happy Planting!